4. Relying on Windows Server Backup to Protect the Directory
Although you can use special
tools to access the tombstone data in the directory, doing so does not
always provide the best method for data recovery. For example, objects
that you restore from tombstone
containers do not include all of their previous attributes. Because of
this, you must know which contents and attributes were assigned to the
object before deletion to be able to bring it back to its original
state. However, when you restore the data from backup and reassign it to
the directory, you restore all of an object’s attributes at once, and
you do not need to reassign attributes such as group memberships and so
on. This saves time after the object is restored but requires a more
complex operation to perform the restore.
In addition, restoring objects in
AD DS was more or less a hit-or-miss operation in previous versions of
Windows Server because it was impossible to view objects within a backup
data set prior to the restore. It was and continues to be impossible to
restore different backup sets to different DCs to view the data they
contain. However, Windows Server 2008 R2 includes a new tool, the AD DS
database mounting tool with which you can view backup data set contents
prior to the restore operation. This tool can ensure that you recover
the right version of the object and save you considerable time when you
need to recover an object.
When you work with Active Directory backup and restore operations, you can perform several operations:
You can back up the entire server, including its operating system.
You can back up only the System State Data, data that includes the server’s configuration data as well as the Ntds.dit directory store.
You
can restore nonauthoritative data—data that will be added to the DC but
updated by multimaster replication when the DC is back online.
You
can restore authoritative data—data that will be added to the DC but
will update all other DCs through multimaster replication when the DC is
back online.
You can perform Install From Media (IFM) DC setups that rely on a copy of the Ntds.dit from another DC to reduce the amount of replication required to create the DC during setup.
There are several ways to work
with and use backup data sets when working with DCs in Windows Server
2008 R2. However, if you are familiar with DCs from previous versions of
Windows, you will find that several operations are different in Windows
Server 2008 R2:
Backups are performed with Windows Server Backup or through its corresponding Wbadmin.exe
command-line tool. Both are Windows Server 2008 R2 features and must be
added to the server to be made available. They are not installed by
default.
Backups are not discrete. They capture critical volumes in their entirety. On a DC, these volumes include the following:
The system volume
The boot volume
The volume hosting the SYSVOL share
The volume that hosts the AD DS database
The volume that hosts the AD DS logs
As with previous versions of Windows, backups can be automated or manual.
Backups
cannot be performed to tape drives or dynamic volumes, only to network
drives, removable hard drives configured as basic volumes, or DVDs and
CDs.
You cannot back up individual files. Windows Server Backup supports full volume backups only.
If
you want to protect only the system state data, you must use the
Ntdsutil.exe command-line tool. To do so, you must use the new IFM
subcommand available in Ntdsutil.exe
to capture this information for Install From Media installations. If
the installation is for a read-only DC, this tool automatically strips
AD DS secrets from the data to create secure installation media.
Backup operators cannot create scheduled backups; only members of the local Administrators group have this privilege in Windows Server 2008 R2. In most cases, this means being a member of the Domain Admins group on DCs.
If
a server is down, you must use a local copy of the Windows Recovery
Environment (WinRE) to restore the system. WinRE can either be installed
locally or found on the Windows Server 2008 R2 installation media.
These new capabilities affect
the way you work with DCs in Windows Server 2008 R2. Use the following
recommendations when building DCs to make them easier to recover:
Run each DC as a single-purpose server and do not add any other roles except the DNS Server role to the server.
Run
DCs as virtual machines under Windows Server 2008 R2 Hyper-V. DCs are
ideal candidates for Hyper-V because they mostly require network
throughput and processing capability to manage logons. Even if your
domains include thousands of users and have a high processor usage
during key logon periods such as the morning and the afternoon after
lunch, virtualize them and assign more resources to them.
Do
not store any other data on the DC, although you can use separate
volumes for the DC database and logs if your AD DS database includes
large numbers of objects.
Transform
the Windows Installation Media into an ISO file and make it available
on your Hyper-V hosts so that it is readily available if you need to
restore the DC. If not, install WinRE onto each DC you create. To do so,
you will need access to the Windows Automated Installation Kit (WAIK).
Note:
MORE INFO WINDOWS AUTOMATED INSTALLATION KIT (WAIK)
For more information about the Windows Automated Installation Kit, go to http://go.microsoft.com/fwlink/?LinkId=90643.
Perform regular, automated backups of your DCs. These can be to a dedicated basic volume or to a mapped network drive.
Protect
the Directory Services Restore Mode password carefully. This password
must be used to restore data to a DC, and, because it is a highly
privileged password, it must be protected at all times.
Note:
MORE INFO AD DS BACKUP AND RECOVERY
For more information about AD
DS backup and recovery, see “Step-by-Step Guide for Windows Server 2008
Active Directory Domain Services Backup and Recovery” at http://technet.microsoft.com/en-us/library/cc771290(WS.10).aspx.
4.1. Working with the System State Only
On a server running the AD DS role, system state data includes the following data:
Registry
COM+ Class Registration database
Boot files
System files that are under Windows Resource Protection
Active Directory Domain Services database
SYSVOL directory
When other server roles are
installed on a system, the system state includes the first four objects
listed previously plus the following files:
For the Active Directory Certificate Services role: AD CS database
For the Failover Cluster feature: cluster service information
For the Web Server role: IIS configuration files
System state information is important, although it cannot be captured as-is through Windows Server Backup. It can, however, be restored because Windows Server Backup supports three restore modes:
Each mode enables you to
recover the information you need when you need it. Remember that backups
generated by Windows Server Backup are always backed up to the same
file and added to file content as changes are identified on the source
system. However, each time a backup is generated, a new catalog file is
created. This catalog file is used to locate data for a particular
backup.
Tip:
TIP
Using Windows Server Backup to
back up volumes and system state data to removable media is an important
part of the exam. Make sure you understand it fully.
4.2. Creating Installation From Media Data Sets
When you need to stage DCs in
large networks, you might prefer to use removable media to create the
initial directory content rather than filling up bandwidth to replicate
directory contents during the DC installation process. To do this, you
rely on Installation From Media (IFM), but to create the media, you must use the Ntdsutil.exe command with the IFM subcommand.
Ntdsutil.exe is a
command interpreter and can be used either interactively or through a
single command line that provides all options. Table 4 describes the options available in the IFM subcommand.
Table 4. Ntdsutil.exe IFM Subscommand Options
| DC TYPE | OPTION | DESCRIPTION |
|---|
| Writable DC | Create Full destination | Create media for a normal DC or for an AD LDS instance in a destination folder. |
| RODC | Create RODC destination | Create secure media for an RODC in a destination folder. |
| Writable DC with SYSVOL data | Create SYSVOL Full destination | Create media for a normal DC, including the entire SYSVOL folder, in a destination folder. |
| RODC with SYSVOL data | Create SYSVOL RODC destination | Create media for an RODC, including the entire SYSVOL folder, in a destination folder. |
Ntdsutil.exe is the only tool that supports the creation of media for installation. You work with this tool in the practice at the end of this lesson.
4.3. Performing a Full System Backup
You perform a full
system backup in one of two ways: interactively and through a scheduled
task. Either method can be performed through the graphical interface or
the command line. Begin with the graphical interface. Remember that Windows Server Backup is a feature that must be installed before you create any backups.
4.3.1. Creating an Interactive Full System Backup with Windows Server Backup
Creating an Interactive Full System Backup with Windows Server Backup
Use the following procedure to protect AD DS data with Windows Server Backup. This procedure applies to both the full installation
and Server Core, but when applied to Server Core, it must be performed
remotely. Use the Connect To Another Computer option in the action pane
to connect to a server running Server Core.
Log on to a DC with domain administrator credentials, and launch Windows Server Backup from the Administrative Tools program group.
If a User Account Control dialog box appears, confirm the action and click Continue.
Click Backup Once in the Actions pane. This launches the Backup Once Wizard.
If
this is the first time you have run the Backup Once Wizard, click
Different Options and click Next. If not, you can also click The Same
Options.
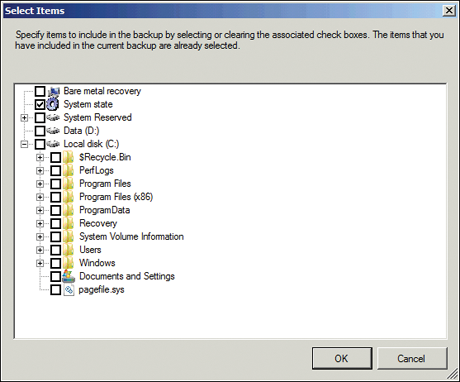
Click Full Server (Recommended), and then click Next.
Note
that you can also select Custom, where you can omit anything, including
specific volumes. You can omit folders and even select only the System
State, as shown in Figure 5.
Remember that your DCs should be single-purpose servers and, as such,
you would not need to exclude any volumes. However, if you are backing
up to a local disk, you should exclude this target volume from the
backup operation. Note that when you use the custom option, you can
select an option called Bare Metal Recovery, which automatically
captures all the data required to recover a full system.
Choose the destination (either Local Drives or Remote Shared Folder) and click Next.
You can target DVDs, CDs, local drives, locally attached removable hard drives, or network shares.
If you targeted a local drive, select the drive, make sure it has enough space, and click Next.
If you selected Full Server, Windows
Backup warns you that the target drive is also included in the list of
items to back up and asks if you want to exclude it from the backup
items. Click OK.
Click Backup to perform the backup.
You do not need to keep the
backup window open for the backup to complete because it will continue
in the background; however, it is useful to watch the progress of the
backup operation at least once.
Creating an Interactive Full System Backup with Wbadmin.exe
You can also perform this
operation at the command line through the Wbadmin.exe command. This
procedure applies directly to either the full installation or Server
Core. In the full installation, you must use an elevated command
prompt—in Server Core, the command prompt is always elevated by
default—and use the following command syntax:
wbadmin start backup -allcritical -backuptarget:location -quiet
where location is the drive letter or path to the target drive. Also, you use the –quiet option to avoid having to type Y for the operation to proceed.
Scheduling a Backup with Windows Server Backup
Use the following procedure to protect AD DS data automatically with Windows Server Backup.
Log
on to a DC with domain administrator credentials and launch Windows
Server Backup from the Administrative Tools program group.
If a User Account Control dialog box appears, confirm the action and click Continue.
Click Backup Schedule in the Actions pane. This launches the Backup Schedule Wizard; click Next.
Click Full Server (Recommended), and then click Next.
Note
that you can also click Custom, but this will not let you omit anything
other than specific volumes. You cannot omit folders. Also note that in
this wizard, when you use the Custom option, you cannot select the
Enable System Recovery option.
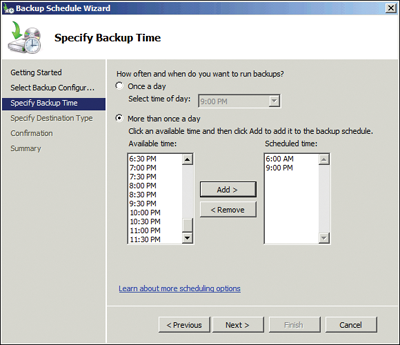
On
the Specify Backup Time page, choose the time of day for the backup.
You can alternatively choose to back up the system more than once a day.
Click Next.
On
the Specify Destination Type page, click Back Up To A Hard Disk That Is
Dedicated For Backups (Recommended) and click Next. You can also select
to back up to a volume or a network share, but a dedicated disk is by
far the best option.
On
the Select Destination Disk page, click Show All Available Disks,
select the remote storage device, and click OK. Select the disk and
click Next. If you selected Full Backup, Windows Backup prompts you to remove the disk from the selected items list. Click OK.
Warning:
IMPORTANT USING VIRTUAL HARD DISKS FOR BACKUP
Consider using virtual
hard disk (VHD) drives as backup targets because of their portability.
You can store all VHDs in a central location and place them on a single
removable drive to send to an offsite location. This lets you combine
multiple backups on one disk as opposed to using multiple removable
disks, one per protected system.
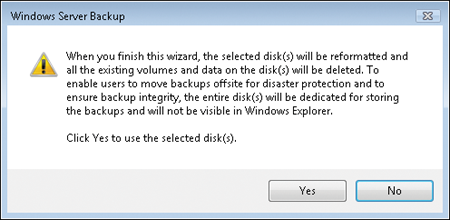
When you click Next, the wizard tells you that the target disk will be reformatted. Click Yes.
Windows
Server Backup requires exclusive access to the target device and,
therefore, must format it when the scheduled backup is created.
Confirm your options and click Finish.
Click Close to create the schedule.
The target disk is formatted, and the task is added to the system’s Scheduled Tasks list.
You can also perform this
operation at the command line through the Wbadmin.exe command. In this
case, you must use an elevated command prompt and rely on several
commands. Begin by identifying the ID of the target disk:
wbadmin get disks >diskidentifiers.txt
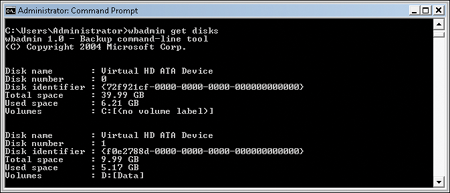
This returns a list of the disks attached to a system and places it in the Diskidentifiers.txt file. The Wbadmin.exe
command relies on disk identifiers or globally unique identifiers
(GUIDs) to locate a disk. You pipe the results of the command into a
text file so that you can copy the target disk’s GUID to the clipboard
and reuse it in later commands.
To capture the disk GUID, type:
notepad diskidentifiers.txt
Highlight the disk identifier you need, including the brackets, and copy it to the clipboard. Close Notepad.
You are ready to create the schedule. Type the following commands:
wbadmin enable backup -addtarget: diskid -schedule:times -include:sourcedrives
where diskid is the GUID you copied. (Right-click, and then click Paste to add it.) Times
is the times when you want the backup to run in HH:MM 24-hour format.
If more than one time is required, separate each with a comma. Sourcedrives are the drive letters of the drives to protect. For example:
wbadmin enable backup -addtarget:{f0e2788d-0000-0000-0000-000000000000}
-schedule:21:00,06:00 -include:C:
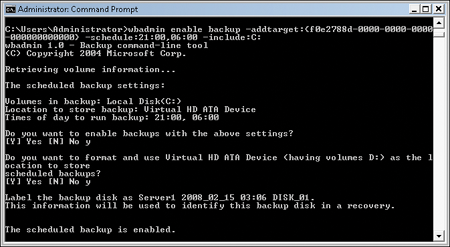
will schedule a backup
of drive C at 9:00 P.M. and 6:00 A.M. to the target drive identified by
the GUID. You must confirm the command after you enter it.
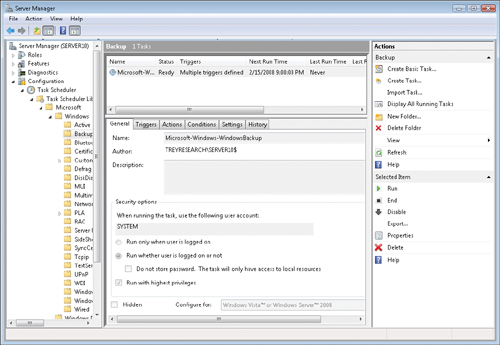
The result is a new scheduled task in the Microsoft\Windows\Backup node of the Task Scheduler. (See Figure 6.)
You can use this
procedure to generate batch files to create these jobs, but you must
pipe the results into a text file; otherwise, you will have no record of
the labels for the removable disks.
Also note that the target
drive is reformatted each time the backup is run. If you need more
granular schedules or if you want to change from a daily to a weekly
schedule, you can modify the task in Task Scheduler after the
Wbadmin.exe command has created it.